Monday, July 29, 2013

live, laugh, love

live, laugh, love by eatzycath
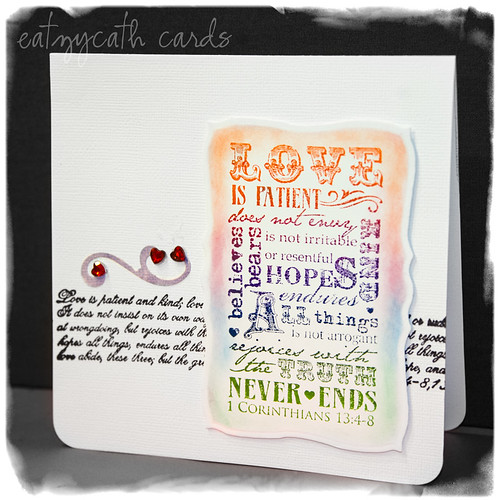
live, laugh, love, a photo by eatzycath on Flickr.

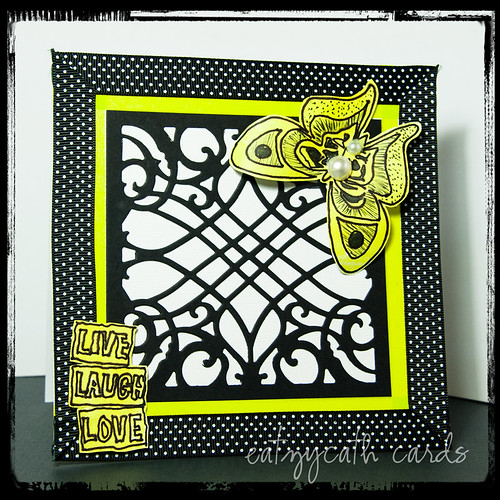
I would not normally use black and neon yellow together as the contrast between these colors are so stark.... so it was truly a challenge to combine black, white and neon yellow on a card, as set by The Play Date Cafe for this week's challenge "It's a {splash} of Neon".

* decided to go with a main graphic design using a die-cut in black (die from Cheery Lynn's Princess' Garden Window Frame)
* after sticking to the white card base, I frame the outer square with neon yellow washi tape, followed by another frame in black polka-dotted ribbon
* affixed the butterfly and sentiment with mounted foam tape
* butterfly is actually a stamp from Hero Arts/Basic Grey - Butterflies and Print stamp set - I actually stamped using Hero Arts Neon Yellow inkpad, and then I outlined the shape of the butterfly by hand in black ink to recreate the hand-drawn look

Saturday, July 27, 2013

celebrate each day

days by eatzycath
days, a photo by eatzycath on Flickr.

card was designed based on this sketch from this week's CAS(E) this Sketch #38

Needing to create some long elements, I remembered that I had these 'day' stamps from Hero Arts/Studio Calico - Weekdays stamp set - which were perfect for the design - coupled with the 'celebrate' sentiment stamp from Paper Smooches: Pretty Phrases stamp set.

With a bit of sparkling ink from Uni-ball Signo gel pens and a couple of mini pearls and the card came together easily!

scooting by to say hi

scooting by by eatzycath
scooting by, a photo by eatzycath on Flickr.

dabbing, spraying and playing with ink is messy.... but I love the final result - unique and hard to repeat!

this card was inspired by Paper Smooches SPARKS July 22-28 Picture Perfect Challenge of a sunset


* the card background was created using the masking technique (both the positive and negative parts of the circle) to create the yellow/orange/red sunset and the dabs of muted colors on the background
* the scooter stamp was stamped on 3 different colored patterned papers and pieced together (scooter and sentiment stamps - Paper Smooches: Spiffy Scooters set)
* the buildings in silhouette were stamped on white card in black ink and fussy-cut (stamp - Paper Smooches: Super set)

Tuesday, July 23, 2013

wishing ewe happiness

wishing ewe happiness by eatzycath
wishing ewe happiness, a photo by eatzycath on Flickr.

these 'sheep' stamps from Penny Black ("plimsoll pete" and "bah-quet") are so cute not just in their names but in their innocent expressions, that I had to use them as part of the card design for CAS(E) this Sketch #37.

* the images were stamped, water-colored and fussy-cut - in the case of 'plimsoll pete' (sheep with colored shoes), image was stamped 4 x
* the square green patterned paper was distressed at the edges and affixed to the card-base
* using a white-ink pen, a border was drawn around the inner edge of the green square
* the sentiment 'wishing ewe' from Penny Black was stamped at the bottom right corner in VersaMark and white embossed
* sheep images were added to the card with dimensional tape

Sunday, July 21, 2013

together we can do so much

together by eatzycath
together, a photo by eatzycath on Flickr.

I love how the sentiment in this card worked so well together with the vertical line of cute little mice, and this is thanks to the Fusion Card Challenge #13 design sketches, which have been combined in this card:

* after stamping the vertical line of mice, I placed the die-cut near the top portion of the vertical line, and die-cut the rectangle around the top mice and the third mice
* sentiment was stamped on the blue patterned paper and cut into a shape of a banner
* I then fussy-cut around the second mice on the left and right edges at width just enough for the banner to slide through
* a second larger rectangle was then die-cut in the red patterned paper
* after coloring the image in water-color, the rest of the mice were fussy-cut, and the whole thing put together, with the help of dimensional dots at the right places

The mice stamp is from Penny Black - Everest Next, whilst the sentiment comes form IO-impression obsession - Fabulous Friend clear stamp set.

Card was also submitted for Penny Black and More's July Challenge - "Dies and Punches" theme.

Saturday, July 20, 2013

LIVE colorfully

LIVE colorfully by eatzycath
LIVE colorfully, a photo by eatzycath on Flickr.

card was actually made for CAS-ual Fridays CFC #109 challenge (theme: Polka Dots) 

but I was too late in submission.... but still I had fun using polka dots throughout the card ...
*from the bottom base patterned paper
*down to the label die-cut in dotted patterned paper (die-cut is from Spellbinders Nestabilities - Labels Sixteen range)
*and finally coloring in the dots in the "LIVE colorfully" sentiment from Hero Arts - Glow Girl stamp set

Wednesday, July 17, 2013

News Flash!

News Flash! by eatzycath
News Flash!, a photo by eatzycath on Flickr.

Card was inspired by
1. color choice of red, blue, grey and cream in this week's Paper Smooches July 15-21 Cool Shades Challenge - Celebration


2. card sketch from CAS(E) this sketch #36


Love the choice of colors but I didn't want the card to end up looking too patriotic with the reds and blues - so I decided to choose a non-patriotic subject - the television!

* after stamping the television (stamp is from the Paper Smooches - Boob Tubes stamp set), I cut out the centre screen portion and backed the same with a zigzag-pattern paper
* the zigzag theme was repeated in the centre circle - which was die-cut both in red and in the grey polka-dotted paper using QuicKutz Nesting Pinking Circles die
* the banner (from the Paper Smooches -Streamers stamp set) was matted on dark blue paper
* banner and tv set were fixed on the card using mounting tape for extra dimension

PS Note: hurrah ... this card was chosen for Featured Player mention in the Paper Smooches Cool Shades Challenge!

Sunday, July 14, 2013

Hello, Baby

Hello, Baby by eatzycath
Hello, Baby, a photo by eatzycath on Flickr.

It's always such a joy making cards to celebrate a newborn child ..... and with this week's Muse #25 challenge, which features the colors of pink and blue, a baby card is just begging to be made! Below is the Muse inspiration card from Therese -

The cute image stamps come from Hero Arts - New Baby stamp set, whilst the 'hello baby' sentiment comes from Paper Smooches - Word Up stamp set.

The pram was first stamped on the white card to use as the base for the paper piecing to come - using stamped pieces of the various images cut up from light blue and pink patterned papers and layered onto the card with mounting tape.

Dare to be Remarkable.... roar!!


A simple card with a 'roaring' message to encourage a young one ..... 'grrr....rrr..."

The design was inspired by this week's CAS(E) this Sketch #36 challenge.

This was a really fun card to make, especially with the coloring of the lion image, a wood-mounted stamp from Penny Black - His Majesty.

* The center banner is actually light yellow vellum - the texture was added by passing the banner through an embossing folder.
* The sentiment is a stamp from Impression Obsession - Follow Your Heart stamp set - stamped on a die-cut label from Spellbinders Nestabilities - A2 Distressed Edges set.
* a couple of zig-zagged cut patterned paper at the bottom of the white label and some orange pearls - and the card is done!

All things grow with LOVE

All things grow with LOVE by eatzycath
All things grow with LOVE, a photo by eatzycath on Flickr.

A second card made for this week's Paper Smooches July 8-14 Designer Drafts challenge, based on the card sketch below.


A very simple card to make,
* die-cut the circle on white card - I used the QuicKutz Nesting Floral Doilies set
* on the bottom half of the circle die-cut, I used a handmade stencil by cutting freehand a rolling form edge, and then colored in layers using chalk in dark brown and green (to represent the mounds of earth)
* using the Paper Smooches Green Thumb 1 die, I die-cut the watering can on green polka-dotted patterned paper, and then stamped the watering can from the Green Thumb stamp set
* the sentiment "All things grow with Love" from Impression Obsession was stamped in sepia ink
* the watering can was then affixed with mounting tape
* the little hearts were stamped in orange ink, and then dabbed with glitter glue
* final touch - a round brad with apple motive was added on top of the alphabet "O" in the word "LOVE"
* circle was then affixed to the green cardstock base using mounting tape

Friday, July 12, 2013

thanks teacher, you rock!

teacher, you rock! by eatzycath
teacher, you rock!, a photo by eatzycath on Flickr.

I love playing with the Paper Smooches stamps - so versatile and such cute cartoony characters, like this little mad curly-haired professor!

Card was inspired by this week's Paper Smooches 8-14 July Designer Drafts challenge

check out the draft design below

The books, apple and professor stamps came from PS Smarty Pants set whilst the 'You Rock' sentiment came from PS Sentiment Sampler set.

* the books stamp was stamped 3 times, one on top of the other to create a stack, and finally topped off with the apple stamp
* once the stack of books image and the professor image are colored, they were fussy-cut with a thin white edge
* the pseudo blackboard is actually a black card with white edges, upon which I stamped the two sentiments in VersaMark and then white-embossed
* to create the slightly chalky look of a blackboard, I used a sponge dabbed in white chalk ink and lightly dabbed over the black card
* the stack of books was fixed on with mounting tape for dimension, and the mad little professor was fixed on with an Action Wobble Spring so that there's a bit of 'mad' wobbling when the prof is touched!

PS Note: thrilled that this card was chosen to be Featured Player in the PS Designer Drafts Challenge!

Thursday, July 11, 2013

Thinking of You

Thinking of You by eatzycath
Thinking of You, a photo by eatzycath on Flickr.

Another card made for the 1-layer card challenge at the Hero Arts flickr group - CAS cards are really quite addictive as we grapple with the challenge of not adding layers to a card!

* first, I used a Labels Sixteen die-cut from Spellbinders Nestabilities to cut out the label from plain white paper
* using the negative part of the white paper placed over the white cardstock, I then colored the inner unmasked portion with dye ink of different colors
* the 'thinking of you' sentiment comes from Hero Arts - Made with Love stamp set - this was stamped in red ink in the center of the colored space and clear-embossed
* with negative mask removed, I then placed the die back onto card in a slightly offset position and outlined the die in black ink, once with a thicker nib and then a second time in a different offset position with a thinner nib
* I then replaced the label mask and stamped in black using the whirly flower stamp from Hero Arts-Basic Grey Sweet Threads Thank You clear stamp collection at opposite corners of the label
* with label mask still in place, the card was then misted using Glimmer Mist
* dabs of glitter glue were then added to the petals of the swirly flower design

Tuesday, July 9, 2013

great cycling friend

great cycling friend by eatzycath
great cycling friend, a photo by eatzycath on Flickr.

Card was made for the 1-layer card challenge from Hero Arts.

* the main image of the girl and boy on the bicycle (stamp is from IO-Impression Obsession - Fun Friends) was stamped first - I used teal metallic ink which provided a nice sheen to the stamped image (unfortunately, the sheen is not very noticeable in the picture)
* then I die-cut a scalloped circle to use as a mask
* with mask over the stamped image, I then stamped the background with Hero Arts - Newspaper Background wood-mounted stamp colored with Kaleidacolor Rainbow Dye Inkpad (Caribbean Sea color range)
* the "great friend" sentiment comes from Hero Arts - Made with Love stamp set - stamped in lime green and clear embossed
* with the scalloped circle mask in place, I lightly colored the newsprint background using co-ordinating chalk colors of light yellow, blue and green

Monday, July 8, 2013

congratulatory splatters

congratulatory splatters by eatzycath
congratulatory splatters, a photo by eatzycath on Flickr.

a polka-dotted themed card ..... with design inspired by this week's CAS(E) this Sketch #35


* the white card-stock was stamped with the little paint splatter stamp from Hero Arts - Brush Strokes stamp set, in different colors of blue, red, yellow, purple and grey
* after stamping, the card was embossed with a polka-dotted embossing folder
* different lengths of washi tape in corresponding colors were affixed to the left side of the card
* the scalloped oblong circles were die-cut using Spellbinders Nestabilities die-cuts in red cardstock and with a smaller piece in polka-dotted patterned paper, and then affixed to left side of the card with part of it folded behind the white cardstock
* the banner stamp and 'congratulations' sentiment stamp come from Paper Smooches Streamers and Sentiment Sampler stamp sets - I trimmed off the left side of the banner and chalk-colored the edges of the banner

Sunday, July 7, 2013

Sunday Verse - Matthew 19:26

Matthew 19:26 by eatzycath
Matthew 19:26, a photo by eatzycath on Flickr.

I would dearly love to share this verse from the Bible with all of you - Matthew 19:26 '....With men this is impossible; but with God all things are possible.' There are many days when things seem so out of control and situations appear impossible - yet these are the precious days when we turn to our Lord, the almighty creator of all things, and remind ourselves that all is under His control!

The design of this card was inspired by the following Mojo Monday's sketch challenge - Mojo Monday 300 Challenge.

The circle element was replaced with a flower lei die-cut - from Memory Box's Lovely Lei - embossed with copper embossing powder.
The centre square is also a die-cut from QuicKutz' Nesting Square Doilies set.

Have a blessed week ahead!

Saturday, July 6, 2013

an ocean special

ocean special by eatzycath
ocean special, a photo by eatzycath on Flickr.

this is my second entry for this week's Paper Smooches SPARKS Trend Watch Challenge - Ocean theme, inspired by the following photo

To create the blue swirly background:
* stamp with VersaMark using Hero Arts - Magical Background stamp
* emboss with white embossing powder
* sponge-colored using a combination of blue distress inks
* sides trimmed, with the top cut using Paper Smooches Wise Dies - Borders 1 die-cuts

All the little fishes, jelly-fish and sea-weeds are stamped using Paper Smooches - Briny Blue stamp set - colored with Copic markers, cut and fixed onto the blue background, some with foam tape for dimension.
Final touches - stamp "You're Special" sentiment by the side, add blue ribbons, bow and brad

PS Note: this card was my very first "Featured Player" mention for a PS SPARKS challenge... hip hip hurrah!

a beary birthday

a beary birthday by eatzycath
a beary birthday, a photo by eatzycath on Flickr.

I love the incredibly cute range of Popcorn the Bear stamps from Crafter's Companion - why? because the stamps are big (around 4 to 5 inches), so they fill up a card perfectly and the size makes it so easy to color .....

This is the first of my Popcorn the Bear cards - the cute bear with balloons come from the Smile stamp set.
* the bear stamp was stamped twice on white cardstock, and then stamped again on a piece of white paper
* the stamped piece on the thinner white paper was then cut out, and used as a mask over the stamped piece on the cardstock
* the background was then stamped using Hero Arts - Newspaper Background wood-mounted stamp (one of my favourite background stamps)
* the whole image was then colored on the cardstock with the stamped newspaper-background
* only the balloons were colored on the second image stamped on the white cardstock - then cut out and affixed over the main image with foam tape
* edges of the white cardstock was then distressed and inked before affixing to the blue polka-dotted pattern paper (also inked around the edges) and then affixed to the orange card base
* birthday sentiment was stamped on orange cardstock, cut and affixed - final touch, a stripy ribbon in matching colors!

Friday, July 5, 2013

Fishy Hello

Fishy Hello by eatzycath
Fishy Hello, a photo by eatzycath on Flickr.

The theme for this week's Paper Smooches Sparks - Trend Watch Challenge is OCEAN! Such a great theme with lots of possibilities and I get to use my itsy bitsy little fish stamps!

Instead of portraying a huge big ocean, I decided to fit part of the 'ocean' into a little bell jar with a cheery hello from some friendly fishes.

* the bell jar stamp comes from Paper Smooches - Crystal Clear stamp set which comes with matching die-cuts
* I stamped first on white cardstock and die cut the same out - stamped a second time on white card stock and die cut only the lid (which was then colored with silver and glitter blue pens, before affixing onto the base stamped image with foam tape) - finally I die-cut the inner part of the jar from blue vellum paper, which was then affixed to the base stamped image
* the two fishes were stamped using Paper Smooches - Birthday Buddies stamp set, colored and fussy-cut, affixed onto blue vellum portion with foam tape
* the gingham checked 'tablecloth' is actually a triangle cut from a stamped paper using IO - Impression Obsession Cover-a-Card cling background stamp (Gingham)
* affix 'tablecloth' onto bottom part of the card, then affix the jar with foam tape
* the 'Hello There' sentiment was stamped onto the white base card-stock, which was followed by the stamping of the 'talk bubble' in dark blue ink - 'talk bubble' stamp comes from Paper Smooches - He Said, She Said stamp set

Wednesday, July 3, 2013

arrows

arrows by eatzycath
arrows, a photo by eatzycath on Flickr.

a celebration card - to celebrate a special day or a special someone or just to celebrate the essence of life!

card was inspired by (i) CAS-ual Fridays: CFC107 challenge to feature an arrow or arrows;
and (ii) CAS(E) this sketch #34 design as shown below, with the arrows forming the main vertical design whilst the sentiment here ends up being the horizontal element of the card

* sentiment from Paper Smooches (Pretty Phrases stamp set) was stamped first, and then embossed in black
* the arrows were then separately stamped (using the arrow stamp from Hero Arts - Stamp Your Story - Brush stamp set) and embossed separately with green glitter embossing powder, green metallic embossing powder and black embossing powder
* at the top left hand corner of the striped paper, I tore down about an inch and distressed the edges before turning back and stapling the two torn sides
* in the exposed area of the tear - I placed a lace heart sticker for accent

Tuesday, July 2, 2013

love is patient

love is patient by eatzycath
love is patient, a photo by eatzycath on Flickr.

a simple card which took less than 15 mins to make - am definitely loving this clean and simple approach with minimal layers and embellishments

Card design is inspired by the following sketch from CAS(E) this Sketch #34

the making of this card:
* stamped the oblong love sentiment (from Penny Black's Love Chapter stamp set) onto white card using Kaleidacolor (Spectrum range)
* die-cut the same using KCK Kutz die-cuts
* with die-cut still in place, the edges were colored with Pebbles Inc Chalks (Basic Brights range)
* stamped the longer edge-to-edge love sentiment (also from the the same Penny Black Love Chapter stamp set) towards the bottom half of the card
* affixed the die-cut sentiment with mounted tape
* affixed a die-cut flourish (colored in purple ink) with little red hearts as the final touch

this card was entered for the following challenges
# Penny Black & More - June Challenge - theme: CAS (Clean and Simple)

Monday, July 1, 2013

green & yellow circles

green & yellow circles by eatzycath
green & yellow circles, a photo by eatzycath on Flickr.
I love these bright colors ..... and never get tired of them! Thanks to Moxie Fab World's Tuesday Trigger challenge this week - Scene in Tangerine (photo inspiration below) - I get to play and create with these colors in mind.

With the objective of creating a simple card and using these three colors, yellow, tangerine and green:
* I cut out uneven circles from felt in these three colors in different sizes (though I must admit that my so-called tangerine felt was a shade too red)
* the felt circles were layered and affixed with a flower brad each, and glitter glue spread on the edge of the top circle
* edge of the background paper was punched using a Martha Stewart border punch, and the paper was then colored using Ranger Distress inks
* finally the circles were affixed to the colored card before going onto the white cardstock
* sentiment comes from Paper Smooches - Pretty Phrases stamp set

And I just discovered that this card design is perfect for the latest Muse Challenge #24 - inspired by this card from Laurie Willison
and so... my submission is in!